Wednesday, August 7, 2013

Ideal Strains for Total Beginners

Ideal Strain


While all cannabis plants are renowned for their hardiness and general resiliency compared to many other plants, it’s still true that some strains are harder to grow than others. So if you’re just starting out, and you want to increase your chances of harvesting a decent crop, or if you’re someone who is notoriously bad with plants, here are some ideal marijuana strains that are practically fool-proof.


Northern Lights
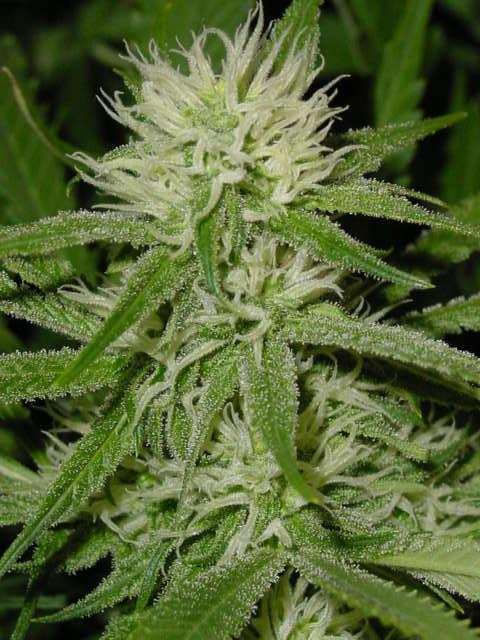

Northern Lights StrainFirst and foremost is Northern Lights #5, commonly referred to simply as Northern Lights, NL, or NL#5. This strain won the Cannabis Cup for several years running and has been a go-to strain for beginners the world over ever since hit the market in 1989.


 Resilient, forgiving of your amateur growing mistakes, and generous in its yield of sticky, dense, resinous buds, you can seldom go wrong with Northern Lights. An indica-dominant hybrid, Northern Lights has a flowering period of 7 – 8 weeks and also produces much less smell compared to other cannabis varieties, making it ideal for indoor stealth-growing. Well-grown plants can be expected to yield as much as an ounce or more per plant, so for a starter’s grow that is a very nice haul.


White Widow


Another exceptional strain for beginners is White Widow. Resistant to bugs and pests, as well as dehydration and nutrient imbalances, White Widow can withstand reasonable mistakes and still produce a worthy crop for your smoking pleasure.


Famed for its dense, resinous buds that are sticky to the touch, White Widow is another hybrid strain that is well-adapted to indoor growth. Properly grown, White Widow will be covered in thick crystals, giving it almost a sugared appearance, and will carry a distinct, lightly-fruity aroma. With high THC-content on average, White Widow is a good strain for the beginner who wants to ensure a stronger, more potent crop.


Ideal flowering time for this strain is generally 8 – 10 weeks, and as a hybrid strain with strong indica characteristics, you can count on White Window to remain manageable throughout its growth cycle. Be prepared for strong scents during flowering, generous yields under decent growing circumstances, and a potent high when you finally cure and smoke your bud.


Ideal Strains for Total Beginners

Monday, August 5, 2013

How to Root Stubborn Marijuana Plants

Some cannabis plants may seem to resist all your attempts to clone them. This can be frustrating, particularly for breeders who use a lot of clones or who are accustomed to having easy success with their cloning techniques. Before you tear your hair out, though, just accept that some strains just give you a hard time, but they can be tamed.


One popular method of rooting stubborn clones is to use the good old-fashion potato graft. To use the potato graft, simply prepare your trimming as you usually would. Select a potato that has at least 2 or 3 eyes, and carve a small hole in it for the cutting. Once you’ve prepared it properly and used the rooting hormone of your choice, insert your cutting into the potato and plant as normal.


The potato graft will keep your cutting moist, and provide it with necessary nutrients to encourage root growth. As your plant grows, the potato will either be used up entirely or may start to grow itself. If you notice potato leaves growing around the base of your cannabis plant, simply trim them away.


Potato grafting also works with older, harder or generally woodier stems and stalks. To root a woodier, harder stalk, you should cut it at roughly 45 degrees and also scrape away the outer bark / skin of the cutting for about ½ inch of the stem. This will expose more of the inner bark (where the cells for root growth are located) to the rooting hormone and soil.


Another method for harder-to-root clones is known as air layering. It requires a bit more finesse and some practice, but the results are that when you take your clone from your plant, it will literally already be a plant on its own, complete with roots and ready for planting.


To develop roots via air layering, select the limb you wish to clone. Choose a spot under a node, just like you would for regular cutting, and prepare the intended root-site by using a sterile razor blade or another suitable sharp object to carefully cut the outer layer of bark off a ½ – 1 inch section of the branch. The goal here is to remove the outer layer of bark, known as the phloem, without damaging the inner layer of bark known as the xylem.


You can also scrape the outer bark away, but scraping is more likely to cause damage to the inner bark, including the xylem and the inner cambium where the roots will grow from. Once the root-site is prepared, apply your rooting aid of choice and then attach a rock wool cube, or secure a pocket or soil or peat moss around the wound site. Keep your rooting area moist and breathable, and roots should form within 1 – 2 weeks at which time you can cut the new clone from the mother plant and put it directly into soil for further growth.


How to Root Stubborn Marijuana Plants

Monday, July 22, 2013

Trimmings: What to do with them

If you’ve ever heard the saying that one man’s trash is another man’s treasure, when it comes to the trimmings you have left over after manicuring your buds this statement has never been truer.


Once you’ve completed your first grow and you’ve trimmed off your fan leaves, sugar leaves and other excess material, you may be left wondering what to do with it all. At first glance, this cast-off material may look like it should head straight to the trash can or the compost pile, but hold that thought because there’s actually a lot you can do with those valuable trimmings.


From making budder and canna-oil, to producing hash oil or bubble hash from your trim and shake, there are many, many uses for this material. The simple fact is that your trimmed material and shake is actually pretty high is THC and other cannabinoid content; but the problem is that those sugar leaves, fan leaves and woodier pieces of stalk just don’t smoke nicely.


No one like a harsh smoke, but plenty of people love them some edibles or a nice hash oil. Indeed, for the adventurous at heart you can even juice the leaves from your harvest and the green leaves from vegetating females and even male plants. Juicing the leaves not only gives you psychoactive benefits, but also many other benefits from the antioxidants and terpenes.


Once you’ve made budder or canna-oil you can then cook with your delicious new ingredients. Try using cannabis-infused olive oil to make a light vinaigrette dressing for salad, or cook your pancakes with some budder for an authentic wake ‘n bake session. When cooking with canna-oil or budder, try to avoid using too much heat because heat breaks down some of the cannabinoids.


Another tasty snack is to slow roast your favorite seeds or nuts in a light grease of canna-oil. Once you take them out of the oven, brush them lightly with budder and add a bit of salt. You can add dried fruit like cranberries, apricots and raisins to make this a delightful medicated trail mix, great for addressing chronic pain and keeping you mildly medicated throughout the day.


If you aren’t in the mood for hash oils, you can make a simple tincture with any strong alcohol. A grain alcohol such as Everclear is perfect for making cannabis tinctures, and stored in dark amber bottles in a cupboard or freezer, alcohol tinctures can last for years on end. With a bit of ingenuity, you can also make cannabis salves and balms for topical application.


In short, when you have the pleasure of harvesting your crop, don’t let all that unsmokable material go to waste. When there’s about a million ways to use cannabis, it seems unnecessary to let this wondrous plant rot on the compost heap or in a garbage bag. So get creative!


Trimmings: What to do with them

Thursday, July 11, 2013

Aeroponic Systems and Marijuana

Whether you’re looking for a more reliable system for use in cloning your cannabis crop, or you’re interested in producing the maximum number of clones possible, aeroponic systems are a great resource for the serious grower. Aeroponic systems are especially useful when you want to root clones from a strain that doesn’t usually respond well to traditional cloning methods. Properly managed, most aeroponic systems require little or no oversight after initial setup, and they can produce viable roots in as little as 6 – 8 days.


One of the best aeroponic systems available, and admittedly one of the more expensive, is the EZ Clone system, available from many online retailers including Amazon. The EZ Clone system comes in several sizes, with room for 30, 60 or 120 clones accordingly. For optimum results with the EZ Clone system, be sure to clean it thoroughly between uses and maintain a pH balance of roughly 6.0 – 6.3 for the water / nutrient blend.


The EZ Clone 30 has room for up to 30 clones and comes with a 12 gallon reservoir, so it’s a fairly sizeable setup, and the larger EZ Clone systems come with bigger reservoirs. But if you aren’t ready to invest ~ $250 – $300 in an aeroponic system like the EZ Clone setups, you can still experiment with aeroponics on an affordable scale.


The Bloom Brothers Cloner Bucket, for instance, comes with everything you need to get started with up to 18 clones in a compact 3.5 gallon bucket, and it costs as little as $65. Cuttings should start showing roots in 5 – 10 days, and the Bloom Bucket comes with neoprene inserts to use in lieu of net pots or other cumbersome materials, as well as a decent pump and 15ml of Clonex rooting gel to help get your clones started on the right track.


Whether you opt for a larger system or a smaller aeroponic bucket or bubbler bucket-style system, the results of aeroponic rooting and even full aeroponic growth through the vegetative and flowering cycles, can be quite rewarding. Certainly, as a method for quickly and reliably establishing robust roots, an aeroponic system seems to win hands-down over its competition.


Remember to use a good rooting gel (Clonex is far and away the most popular) in conjunction with your aeroponic system. While you can certainly get good results from an aeroponic system with no extra help, the rooting gel will speed up root production by an average of 2 – 4 days, depending on your specific circumstances.


Aeroponic Systems and Marijuana

Tuesday, June 11, 2013

The Basics of Marijuana Cultivation

If you’re considering growing your own marijuana, especially medical marijuana, the first choice you need to make is indoor vs. outdoor growing. The legality of marijuana is disputed in many countries, which makes outdoor growing more of a challenge for most growers.


Like many people you may be inclined to grow indoors, but both options can be viable.


When deciding whether to grow inside or outside, you need to keep in mind the conditions that your plants will need in order to grow and thrive.


First and foremost are light and temperature.


Marijuana thrives in warm to tropical climates, and during its vegetative stage of growth it needs 16 – 24 hours of sunlight each day. Quality of light is important as well, and the proper grow lights for indoor use can be somewhat expensive.


The best grow lights are High Pressure Sodium (HPS) and Metal Halide (MH) grow lights. Compact fluorescent tubes can be useful in combination with HPS & MH lights, but fluorescent tubes yield poor results on their own. There are also newer LED units that are being marketed, but to get an LED setup with the proper lumen output is, on average, prohibitively expensive.


Marijuana is a hardy plant, but temperatures too low will result in poor growth and temperatures too high will result in burning the plant.


Ideal temperatures vary based on strain, but most marijuana thrives between a low of 65 degrees Fahrenheit at night and a high of 85 degrees F. in the day. If you grow indoors and you use the proper lights, you’ll need some way to cool your grow-room, and therefore some way to remove the smell from the hot air that you expel.


Filtration systems are a necessity for most indoor grow setups. At a minimum, most growers will use activated charcoal filters to filter the air being expelled from the grow-room. These filters need to be changed regularly, and more serious growers or those who are operating on a larger scale generally add an ozone filtration system to their air system.


Ozone filtration is far more effective at removing the distinctive scent of marijuana, especially during the 2 – 3 month flowering period when it gives off a very potent smell.


Nutrients and water requirements are the next most important factor. All plants need an array of micro and macro nutrients in order to flourish. When nutrient levels are too high or too low, your plants will suffer from deficiencies or from burn and can even die in extreme cases.


Marijuana loves humidity, especially during its vegetative stage. Be sure to keep the humidity somewhere between 40 – 70%, and watch your plants for any signs of under or over-watering. If you over-water your plants, you run the risk of developing root rot and other mealy grubs. When your plants are dehydrated, they will appear wilted and weak, their leaves and branches floppy.


The Basics of Marijuana Cultivation – Written by G


The Basics of Marijuana Cultivation

Trimmings: What to do with them

If you’ve ever heard the saying that one man’s trash is another man’s treasure, when it comes to the trimmings you have left over after manicuring your buds this statement has never been truer.


Once you’ve completed your first grow and you’ve trimmed off your fan leaves, sugar leaves and other excess material, you may be left wondering what to do with it all. At first glance, this cast-off material may look like it should head straight to the trash can or the compost pile, but hold that thought because there’s actually a lot you can do with those valuable trimmings.


From making budder and canna-oil, to producing hash oil or bubble hash from your trim and shake, there are many, many uses for this material. The simple fact is that your trimmed material and shake is actually pretty high is THC and other cannabinoid content; but the problem is that those sugar leaves, fan leaves and woodier pieces of stalk just don’t smoke nicely.


No one like a harsh smoke, but plenty of people love them some edibles or a nice hash oil. Indeed, for the adventurous at heart you can even juice the leaves from your harvest and the green leaves from vegetating females and even male plants. Juicing the leaves not only gives you psychoactive benefits, but also many other benefits from the antioxidants and terpenes.


Once you’ve made budder or canna-oil you can then cook with your delicious new ingredients. Try using cannabis-infused olive oil to make a light vinaigrette dressing for salad, or cook your pancakes with some budder for an authentic wake ‘n bake session. When cooking with canna-oil or budder, try to avoid using too much heat because heat breaks down some of the cannabinoids.


Another tasty snack is to slow roast your favorite seeds or nuts in a light grease of canna-oil. Once you take them out of the oven, brush them lightly with budder and add a bit of salt. You can add dried fruit like cranberries, apricots and raisins to make this a delightful medicated trail mix, great for addressing chronic pain and keeping you mildly medicated throughout the day.


If you aren’t in the mood for hash oils, you can make a simple tincture with any strong alcohol. A grain alcohol such as Everclear is perfect for making cannabis tinctures, and stored in dark amber bottles in a cupboard or freezer, alcohol tinctures can last for years on end. With a bit of ingenuity, you can also make cannabis salves and balms for topical application.


In short, when you have the pleasure of harvesting your crop, don’t let all that unsmokable material go to waste. When there’s about a million ways to use cannabis, it seems unnecessary to let this wondrous plant rot on the compost heap or in a garbage bag. So get creative!


Trimmings: What to do with them